
PCB stack-up design is one of the necessary skills for hardware engineers and PCB engineers. Layout engineers will design the layout based on the stack-up design, including settings such as line width, line spacing, and differential routing. Characteristic impedance matching means that when the signal energy is transmitted, the load impedance is required to be equal to the characteristic impedance of the transmission line. At this time, the transmission will not produce reflection, which means that all the energy is absorbed by the load. Otherwise, there is energy loss in the transmission. Therefore, it is also important to master the calculation of characteristic impedance.
1. Impedance classification
(1) Single Ended Impedance: Impedance measured by a single signal line (commonly used);
(2) Differential Impedance (Differential Impedance): The impedance measured on two transmission lines of equal width and equal distance during differential driving (commonly used);
(3) Coplanar Impedance: The impedance measured when the signal line is transmitted between its surrounding GND/VCC (not commonly used).
2. Impedance factors
(1) Proportional factors: dielectric thickness H1/H2/H3 between circuit layer and ground layer, distance S between adjacent circuits and circuits;
(2) Inversely proportional factors: dielectric constant Er, line bottom width W1, line surface width W2, copper thickness T, substrate solder resistance thickness C1, line surface solder resistance thickness C2, line solder resistance thickness C3, solder resistance dielectric Constant CEr.
Therefore, the relation can be understood as Z=HS/Er*W*T*C*CEr.
3. Laminate design
(1) Determine the base material: According to the use environment requirements of the product and the material preparation situation of the board factory, select the appropriate PCB board (extract Er), the common ones are: Shengyi S1411 150 board with Tg=150, Taiyao TU with Tg=180 -768 plate.
(2) Determine the board thickness: According to the product requirements or equipment structure requirements, determine the finished board thickness of the circuit board. The common ones are: 0.8mm, 1.0mm, 1.2mm, 1.6mm, 2.0mm, and the error is generally 10%.
(3) Determine the number of board layers: According to the density of components and the complexity of the signal, determine the number of wiring layers of the circuit board. The common ones are: single layer, double layer, 4 layers, 6 layers, 8 layers and above.
(4) Determine the layout of the wiring layer: Layout the wiring layer according to the characteristics of the product. For example, the 4-layer board has : Top(Singel)-L2(GND)-L3(GND/VCC)-Bottom(Singel), this method is suitable for Most electronic devices have better SI performance; Top(GND)-L2(Singel/VCC)-L3(Singel/VCC)-Bottom(GND), this method is suitable for radio frequency electronic equipment, and has better EMI performance.
(5) Determine the characteristic impedance value: According to all signal types and characteristics of the product, determine all the impedance values that need to control the characteristic impedance. The common ones are: single-ended characteristic impedance = 45/50/55/60 ohms, differential characteristic impedance = 85 /90/100 ohms.
(6) Design stack parameters: According to the required impedance value, use Polar-Si9000 software to design and control the line width, line spacing, interlayer dielectric thickness, copper thickness, solder mask thickness and other parameters of the signal line to design a reasonable stack Parameters, the general line width should be ≥4mil, the line spacing should be ≥5mil, the dielectric thickness of the signal layer and the reference layer should be 2.5mil≤H≤6mil, the inner layer copper thickness=1oz, and the outer layer copper thickness+Plating=0.5oz.
(7) Design stack table: Design the stack table for confirmation by the board factory, and the board factory will fine-tune and confirm to get the final stack table. Figure 1 below is a general-purpose stack table, and Figure 2 is a special-purpose stack table.
Note: Universal stack table: additional board factory information needs to be provided to the board factory, and the information that does not need to be controlled in the characteristic impedance part of the table is hidden, leaving only the part that needs to be controlled.
Dedicated stack-up table: The stack-up information is more comprehensive, and no additional information is required, and the controlled characteristic impedance is also extracted.

Figure 1 Universal stack-up table for 4-layer board
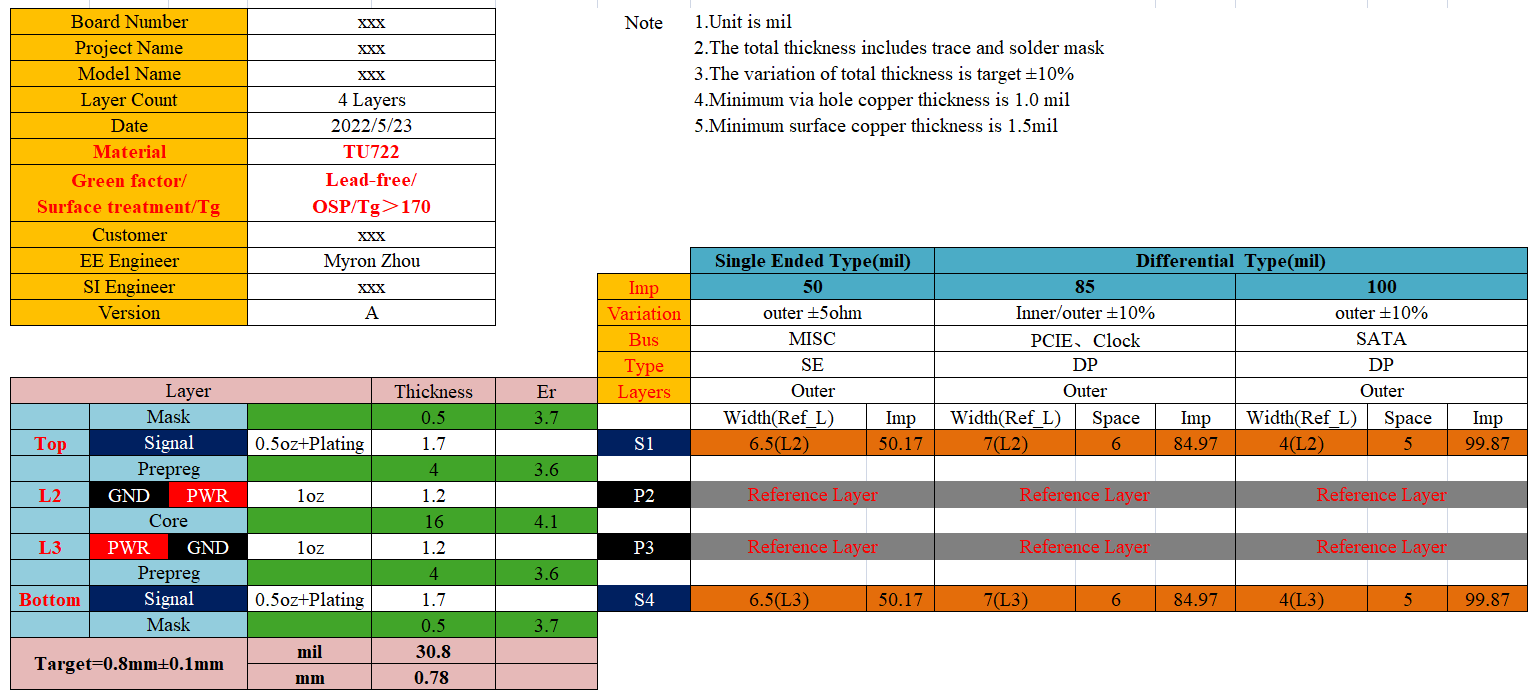
Figure 2 4 -layer board special type stack-up table
4. Characteristic impedance calculation
Polar-Si9000 software is the preferred impedance characteristic calculation software for most engineers. The software provides a total of 93 impedance calculation modes, which fully meet the impedance calculation requirements of most PCB boards, and the accuracy and precision of the calculation results are high. When choosing different impedance calculation modes, the factors of the calculation formula are slightly different, and the basic factors are the above-mentioned H, S, Er, W1, W2, C1, C2, C3, CEr. The reason why the line width is divided into W1 and W2 is shown in the production process in Figure 3 below. In production, the etching potion corrodes the top-to-bottom copper surface, so the etched line width will show a trapezoidal shape. The difference between W1 and W2 is related to the copper thickness, and the difference is generally between 0.3-1.6 mil, as follows:
(1) Inner layer: when copper thickness T=1oz, W1=W2+0.5mil; when copper thickness T=2oz, W1=W2+1.2mil;
(2) Outer layer: when copper thickness T=1oz, W1=W2+1.0mil; when copper thickness T=2oz, W1=W2+1.6mil; ;
(3) Confirm the relationship between W1 and W2 with the board factory.
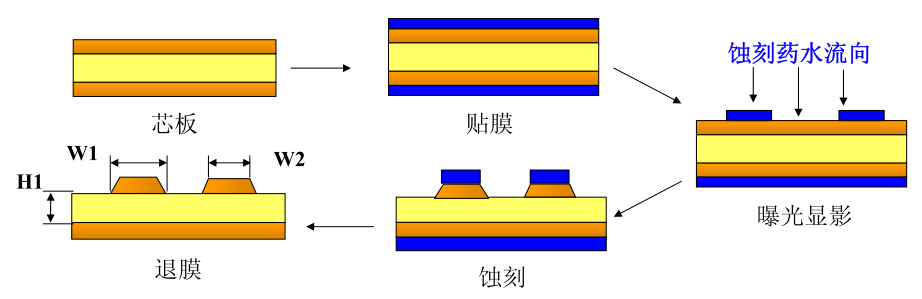

Figure 3 Production process
As shown in Figure 4 below is the Edge-Coupled Coated Microstrip 1B mode of Polar-Si9000. The parameters that can be determined now are (after the plate, ink, and copper thickness are determined): Er1=4.2, T1=1.4mil, C1=0.5mil, C2 =0.4mil, C3=0.5mil, CEr=3.85; H1 is set to 5mil. The remaining adjustable parameters are (differential line width and line spacing): W1, W2, S1. At this time, you can try to set S1 first, then set W1 and W2, or set W1 and W2 first, and then set S1. For example, first set S1=7.5mil, and then slowly adjust the values of W1 and W2 until the characteristic impedance value reaches the expected value (Z=100oz), at this time W1=6.6, W2=5.6. At this point, even if the calculation of the 100-ohm differential characteristic impedance of the layer is completed, if the layer or other layers have characteristic impedance requirements, it is necessary to recalculate in this way until the characteristic impedance of the entire PCB design is calculated.
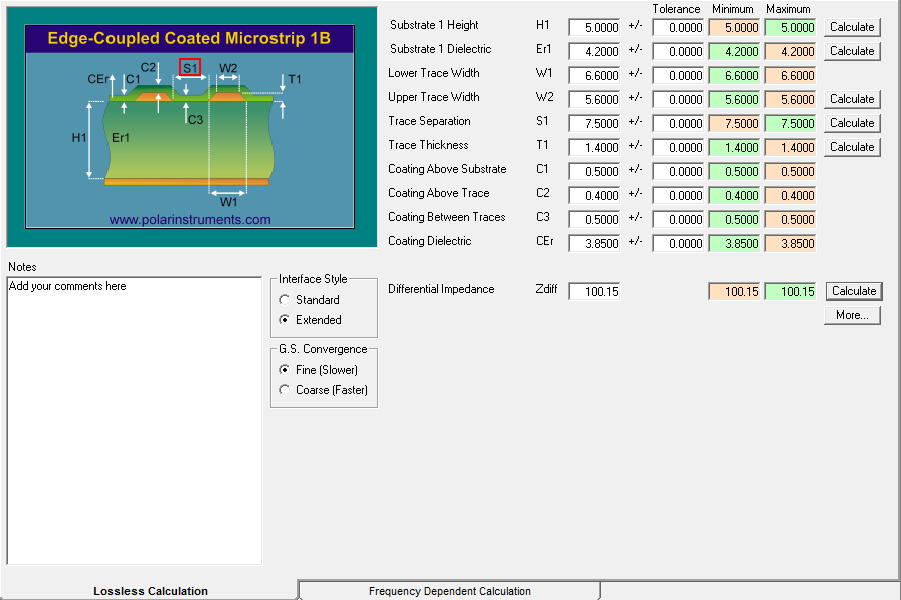

Figure 4 Calculation of differential characteristic impedance of 100 ohms