Devices Required
Let’s start collecting the hardware materials you need to create an automated home:
- Arduino UNO
- Raspberry Pi 2 Model B or latest
- Jumper Wires
- Breadboard
- Light Dependent Resistors
- PIR Motion Sensors
- Relay
- Siemens Contactor (3TF32 00-0AP0)
- Miniature Circuit Breaker (1P C16A)
Overall Configuration
Now, that we have the necessary devices that we need, it is important to understand the basics first.
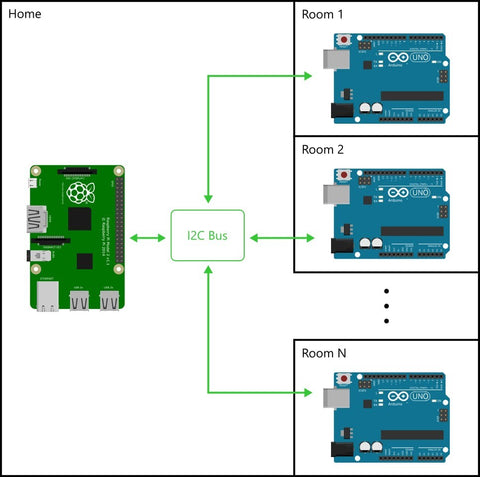
The flow of communication will take place in the following way:
| Room devices—> | Arduino UNO—> | Raspberry Pi |
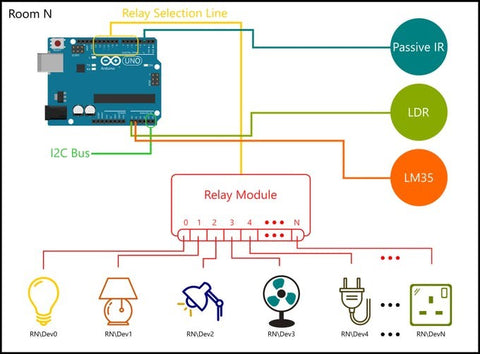
This shows that the Raspberry Pi will serve as the primary device. It will request the information collected by the Arduino UNO from each device placed in different rooms. If there are 3 rooms, 3 Arduino UNO will be put to use. The communication between the Arduino UNO and the Raspberry Pi to create an automated home will be done by the I2C protocol. The Arduino UNO would also have connected one PassiveIR (to detect human presence in the room), LDR (to detect light intensity near room window) and one temperature sensor (LM35 to collect room temperature)
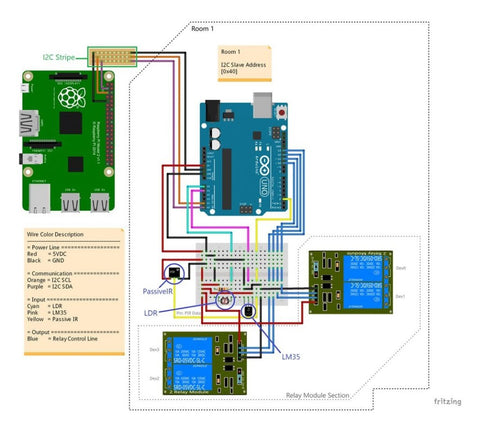
Schematic Overview
Here we have the schematic diagram as to how each device has to be connected to Arduino UNO and finally to the Raspberry Pi board to complete the circuit for a given room. You can refer to the diagram and connect your devices as per the diagram. If you wish to use more than 1 Arduino for a room, you can use an I2C strip.
Software programming
Since our project uses Raspberry Pi and Arduino UNO, we would require Visual Studio 2015 with C# downloaded along with Windows Universal XAML.
Our software would cover the following points:
- Raspberry Pi 2 and Arduino communication protocol
- Class Structure that allows Raspberry Pi to maintain such complicate devices and rooms
- User Interface
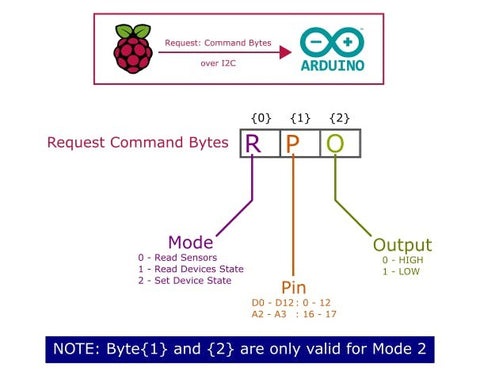
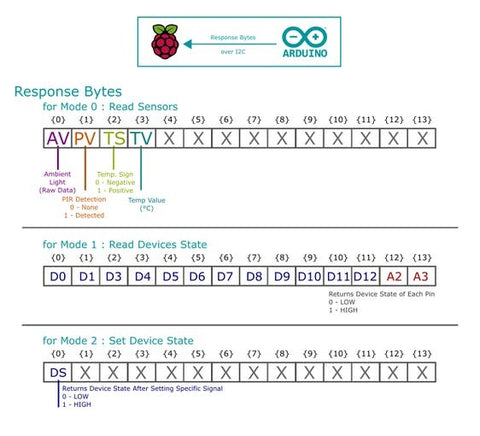
Refer following schematics to understand protocol defined for this project:
(‘X’ is random value or ‘0’,which will be neglected while communicating)
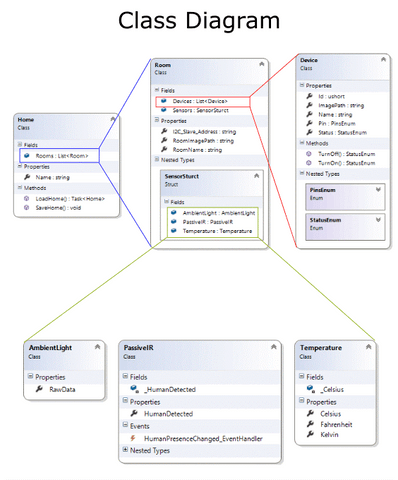
Focusing on the class for the project, since it covers the entire home its OOP structure requires the following class configuration: